Building with Sitecore Agentic Studio: A Developer's Deep Dive

I recently published a post on the XCentium blog covering what Sitecore Agentic Studio is, the types of agents available, and how marketing teams can use it. If you haven't read that yet, its a good starting point for the full picture.
This post is the extended version. Its written specifically for developers who want to go beyond the overview and actually build something. I'll cover what I learned hands-on while building workflow agents inside Agentic Studio, the real problems I hit, how I solved them, and the decisions I'd make differently now.
This post extends the original article published at XCentium.
What I Built and Why
To get hands-on with Agentic Studio, I built a content brief generator. The use case is something most Sitecore teams deal with regularly. A content strategist needs a structured brief before any page or campaign asset goes into production. Collecting the right inputs, formatting them consistently, and making sure nothing is missed is repetitive work that's pretty easy to automate.
The idea was simple. Give the agent a topic, a target audience, and a few context inputs, and get back a fully structured content brief ready for the team to work from. No back and forth, no inconsistent formats, no missing fields.
What I thought would take a few hours ended up teaching me a lot more than I expected about how Agentic Studio actually behaves under the hood.
Choosing the Right Agent Type
The first real decision you'll make as a developer is which agent type to use. The XCentium post covers all three at a high level. Here's how I actually think about the choice from a builder's perspective.
Standard agents are conversational. They're flexible and respond dynamically, but that flexibility works against you when you need a repeatable, structured output every single time. For anything with a fixed pipeline, a standard agent will drift. Users can steer it in unexpected directions and the output format becomes inconsistent.
Workflow agents are structured pipelines. You define the steps, the data flows, and the output format explicitly. There's very little room for the agent to go off script because you're controlling the execution path with the Workflow Editor.
For a content brief generator, Workflow was the obvious choice. I needed the same structure every single time. Consistent sections, consistent formatting, no conversational drift.
My rule of thumb now is this. If you're building something a user will run repeatedly with structured inputs and need predictable outputs, use a Workflow agent. If you're building something exploratory where the user needs to ask follow-up questions and collaborate with the agent across multiple turns, use a Standard agent.
Building the Workflow: Step by Step
Here's how I structured the content brief generator workflow.
Step 1: Context Parameters
The first action in almost every workflow I build now is a Context Parameters step. This is where you extract and normalize user input before passing it anywhere else.
The user provides the topic, target audience, campaign goal, and any additional context. The Context Parameters step extracts these into a structured format, validates that required fields are present, and normalizes any inconsistencies in how different users might phrase their inputs.
Getting this step right saves you a lot of headaches later. If your downstream Content Generation steps receive inconsistent input, your outputs will be inconsistent too. Treat this like input validation in application code.
Step 2: Research and Context Enrichment
Before generating the brief, I added a Research step that enriches the user's input with relevant context. This might include pulling in relevant keyword data, understanding the competitive landscape for the topic, or identifying the right content format for the audience.
This is a separate step from the final output generation. I found that asking a single step to both research and format everything at once produced lower quality results than breaking it into two focused steps. The model does better when each step has a single, clear responsibility.
Step 3: Output Generation with JSON Schema
This is where most of my early pain came from.
The output generation step takes the enriched context and produces the formatted brief. I configured it with a JSON schema to enforce a structured output, because I wanted to render the brief through a HTML template downstream.
Here's the problem I ran into. The model I was using kept ignoring the schema. It would add conversational text before and after the JSON, include markdown code fences around it, or just produce free-form text that looked like a brief but wasn't valid JSON.
I tried tightening the system prompt first. I added explicit instructions like "respond only with valid JSON, no preamble, no markdown, no explanation." It helped partially but wasn't fully reliable.
The real fix came from two changes. First I switched to a different model that respected structured output constraints more consistently. Second I rewrote the system prompt to be much more explicit, specifying the exact schema fields, what each field should contain, the expected data types, and what the agent should do if a field had no data.
The lesson here is worth repeating. The model you select matters a lot. The faster models are tempting because the workflow runs quicker, but if your use case depends on strict output formatting, test your schema enforcement carefully before committing to a model. A slower, more controlled model that produces reliable JSON is worth more than a fast model that requires manual cleanup.
Step 4: Conditional Sections
One thing I added later was a Flow Control step that checks whether certain optional inputs were provided. If the user didn't supply competitive context, that section of the brief is skipped entirely rather than rendering an empty placeholder.
This kind of conditional logic is where Workflow agents start feeling genuinely powerful. You're not just prompting an AI. You're building a real pipeline with branching logic, and the output adapts based on the actual data coming in.
Step 5: HTML Template Rendering
The final step passes the structured JSON through a HTML template that produces a clean, formatted brief document. The template handles all the visual structure so the output is ready to share or drop into a project management tool directly.
One practical tip here. Keep your HTML template simple. I initially tried to make it too clever, with conditional rendering inside the template itself. That gets complicated fast. Better to push the conditional logic into Flow Control steps upstream and keep the template as a straightforward renderer.
Prompt Engineering is Production Code
This is the thing I underestimated most going in.
In a standard application, you write code, test it, and deploy it. Your business logic lives in the code and behaves predictably because code does exactly what you write.
In an Agentic Studio workflow, a significant part of your business logic lives in your prompts. And prompts don't behave like code. They're instructions to a probabilistic model, which means the same prompt can produce slightly different outputs on different runs, and a prompt that works with one model may not work with another.
Here's how I now approach prompts in Agentic Studio workflows.
Be specific about format. Don't say "format the output as JSON." Say exactly what the JSON should look like, field by field, including what to do when a field has no data.
Use plain language, not jargon. I initially wrote prompts in technical shorthand. Switching to plain, explicit instructions improved consistency significantly.
Tell the model what not to do. "Do not add any text before or after the JSON object. Do not wrap the output in markdown code fences. Do not include any explanation." Explicit negative instructions really help here.
Version your prompts. Copy your working prompt somewhere before you change it. I learned this the hard way after a quick tweak made things worse and I couldn't remember what the previous version said.
Test with edge cases early. What happens when the user skips an optional field? What if the topic is too vague to research meaningfully? Test those cases before you consider the workflow done.
When to Chain Agents
The content brief generator is a single workflow agent. But Agentic Studio also supports chaining agents together, where the output of one agent becomes the input of the next.
I can see exactly where chaining would apply for more complex use cases. Imagine a pipeline where:
- A Research agent pulls market data, competitor content, and keyword opportunities for a given topic
- A Brief Generator agent takes that research and produces a structured content brief
- A QA agent checks the brief against a brand style guide and flags anything that doesn't meet the standards
That's a multi-agent flow, and each agent in that chain has a single responsibility. Its the same principle as clean code. Small, focused components that compose well are easier to build, debug, and improve than large monolithic ones.
MCP Integration: The Part That Changes Everything
The Sitecore Marketer MCP server is worth paying attention to if you haven't looked at it yet.
MCP, or Model Context Protocol, is the standard that allows agents to connect with external tools and data sources. With the Marketer MCP, agents can interact directly with SitecoreAI workflows, which means you can start bridging Agentic Studio with the broader Sitecore ecosystem.
The scenarios this unlocks are significant. An agent that pulls content from Content Hub, enriches it with CRM context, and pushes it back into a workflow is no longer science fiction. Its a configuration problem. The plumbing is already there.
For developers, this is the area I'd invest time in understanding deeply. The Agent API and MCP integrations are where Agentic Studio stops being a standalone tool and starts becoming an orchestration layer for your entire Sitecore stack.
Things I'd Do Differently
Looking back at my first workflow agent builds, a few things stand out as lessons I'd apply from day one next time.
Start with the output and work backwards. Before building a single workflow step, I'd define exactly what the final output should look like. Then I'd design the workflow to produce that output. I did the opposite initially and ended up refactoring the middle steps multiple times.
Don't fight the model, change the model. When a model consistently ignores your constraints, switching models is faster than trying to out-prompt the problem. I spent too long trying to force one model to behave before I just switched to something that actually respected the schema.
Use descriptive action names. The Workflow Editor shows action names in the canvas. When you have ten steps and they're all named "Content Generation 1," "Content Generation 2," debugging becomes really painful. Name every action to reflect what it actually does.
Build and test one step at a time. Its tempting to build the whole workflow and then test it end to end. Don't. Add one step, test it with real inputs, confirm the output is what you expect, then add the next step. This makes debugging much faster.
Where to Start If You Haven't Yet
If you're a Sitecore developer who hasn't touched Agentic Studio yet, here's where I'd suggest starting.
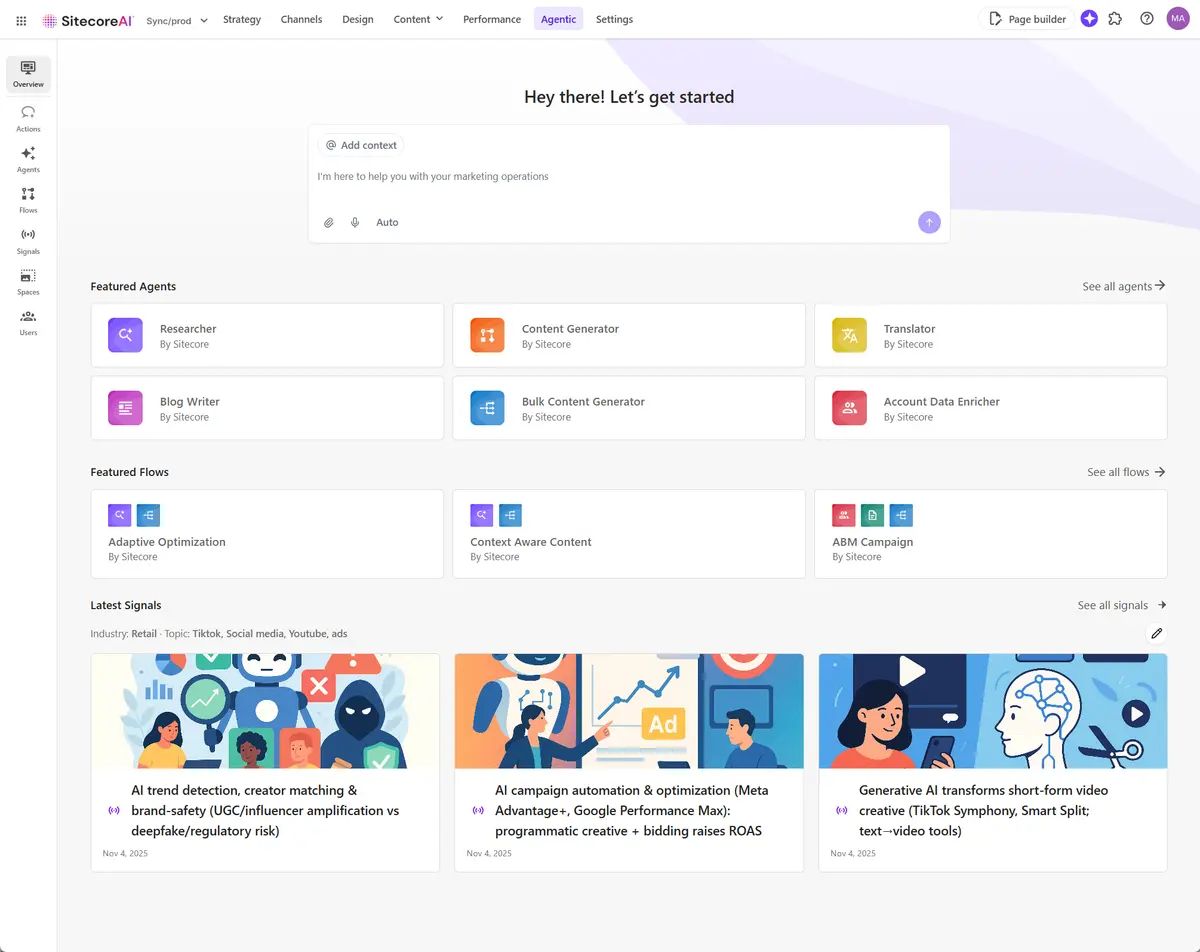
Run the built-in agents first. The Bulk Content Generator and AEO/SEO Researcher are solid examples of well-structured agents. Running them and looking at the inputs they accept and the outputs they produce gives you a good mental model of what a well-designed workflow looks like before you build your own.
Then build something small. A content formatter, a brief generator, or a simple summarizer. Something with two or three workflow steps that you can get working quickly. The goal is to get your hands on the Workflow Editor and understand how variable passing works in practice.
Once you've done that, you're ready to build something real.
The learning curve is manageable. The upside in terms of speed, consistency, and scale is genuinely significant. And right now very few Sitecore developers are building here, which means there's a real first-mover advantage for those who invest the time.
Good luck, and feel free to connect with me on LinkedIn if you're building with Agentic Studio and want to compare notes.