Getting Started with Sitecore Marketplace: Your First Next.js App

Welcome to Sitecore Marketplace—the game-changer that lets you build custom apps just like adding plugins to WordPress, but way more powerful.
In this three-part series, I'll walk you through building Sitecore Marketplace apps from scratch. By the end of Part 1, you'll have your first working app running inside XM Cloud. No fluff, just practical code and real-world insights.
Table of Contents
- What is Sitecore Marketplace?
- Why Marketplace Apps Matter
- Prerequisites
- Understanding the Architecture
- Setting Up Your Development Environment
- Creating Your First Next.js Marketplace App
- Understanding the Marketplace SDK
- Registering Your App in XM Cloud
- Testing Your App
- What's Next?
What is Sitecore Marketplace?
Think of Sitecore Marketplace as an app store for your XM Cloud instance. Launched in August 2025, it's a platform that lets you extend Sitecore's capabilities through custom applications—without modifying the core system.
You're not locked into any specific framework. As long as you're using JavaScript or TypeScript with npm, you're good to go. Next.js, React with Vite, Angular, Vue—all supported.
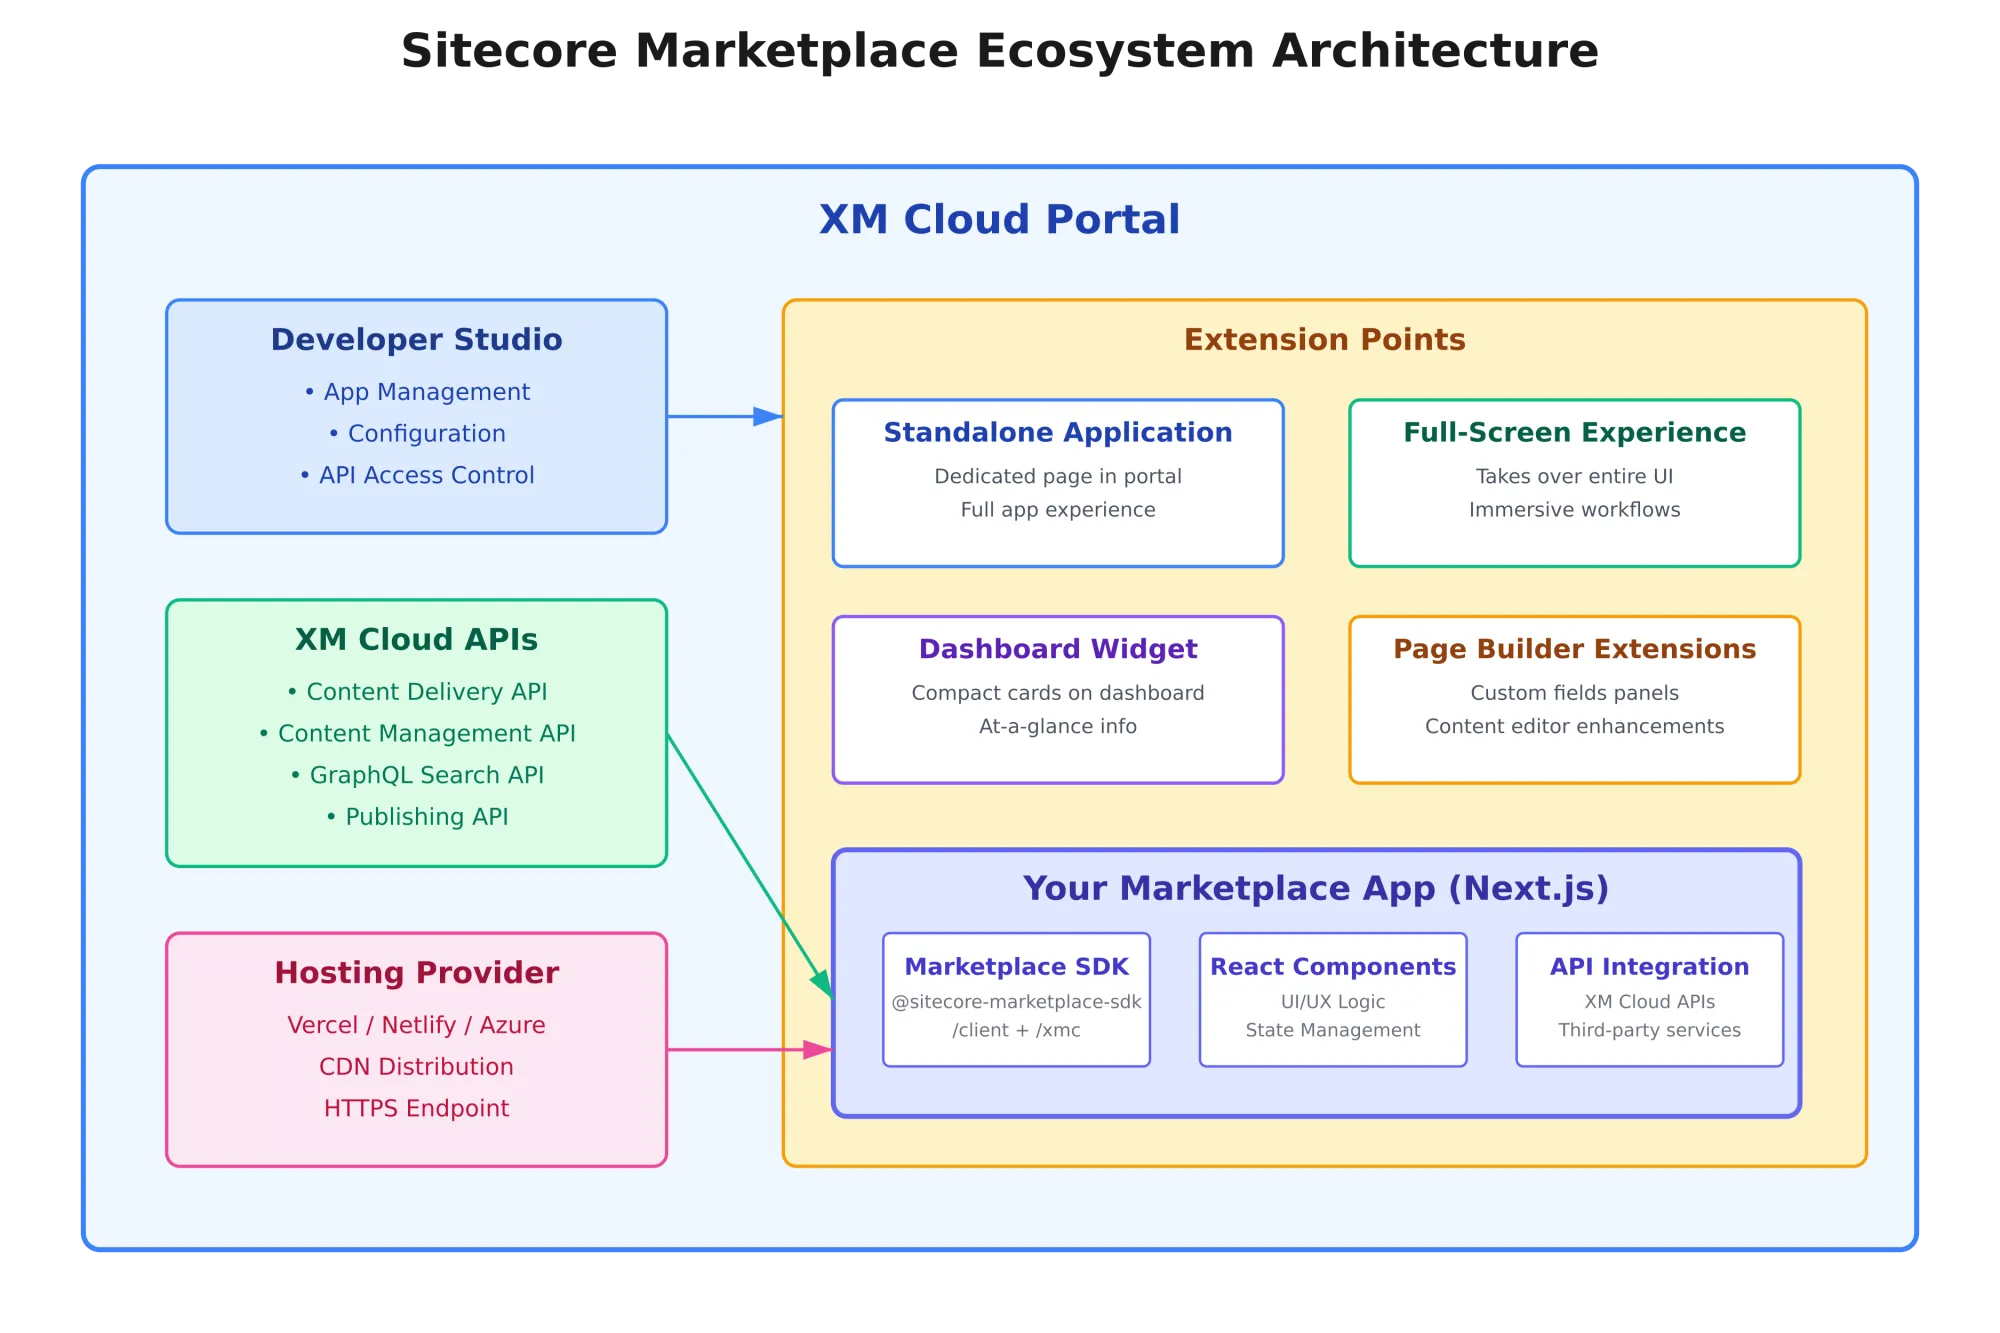
The Core Components
The Marketplace ecosystem consists of three main parts:
1. Developer Studio
Your mission control inside XM Cloud Portal where you manage, configure, and activate apps.
2. Marketplace SDK
The JavaScript/TypeScript toolkit that connects your app to Sitecore. It handles authentication, communication, and data exchange.
3. Extension Points
Specific locations in XM Cloud where your apps can live—like standalone pages, dashboard widgets, or custom content fields.
Why Marketplace Apps Matter
Let me be honest—when I first heard about Marketplace apps, I thought, "Great, another thing to learn." But after building an application, I realized this is actually solving real problems:
1. Keep Your Sitecore Instance Clean
No more backend modifications for every custom feature. Your code lives separately, making upgrades and maintenance way easier.
2. Faster Development Cycles
Use React hooks, modern JavaScript, hot reloading—all the tooling you already know. No fighting with old-school development setups.
3. Independent Deployment
Update your app without redeploying Sitecore. If something breaks, it's isolated to your app, not the entire platform.
4. Better Team Collaboration
Frontend developers can work on Marketplace apps without needing deep Sitecore backend knowledge. Backend teams can focus on content modeling and workflows.
5. Future Business Opportunities
Once the public Marketplace fully launches, you can publish apps for the entire Sitecore community. Think selling WordPress plugins, but for enterprise CMS.
Prerequisites
Let's make sure you've got everything before we start building.
Required
- Node.js v16 or later
node --version - npm v10 or later
npm --version - Sitecore Cloud Portal Access - You need an active XM Cloud organization either with Organization Admin or Owner privilege
- Basic React/Next.js Knowledge - Understanding of components, hooks, and state management
- Code Editor
Quick Setup Check
Run these commands to verify your setup:
# Check Node.js version (should be 16+)
node --version

# Check npm version (should be 10+)
npm --version

# If versions are older, install from nodejs.org
Understanding the Architecture
Before writing code, let's understand how everything connects.
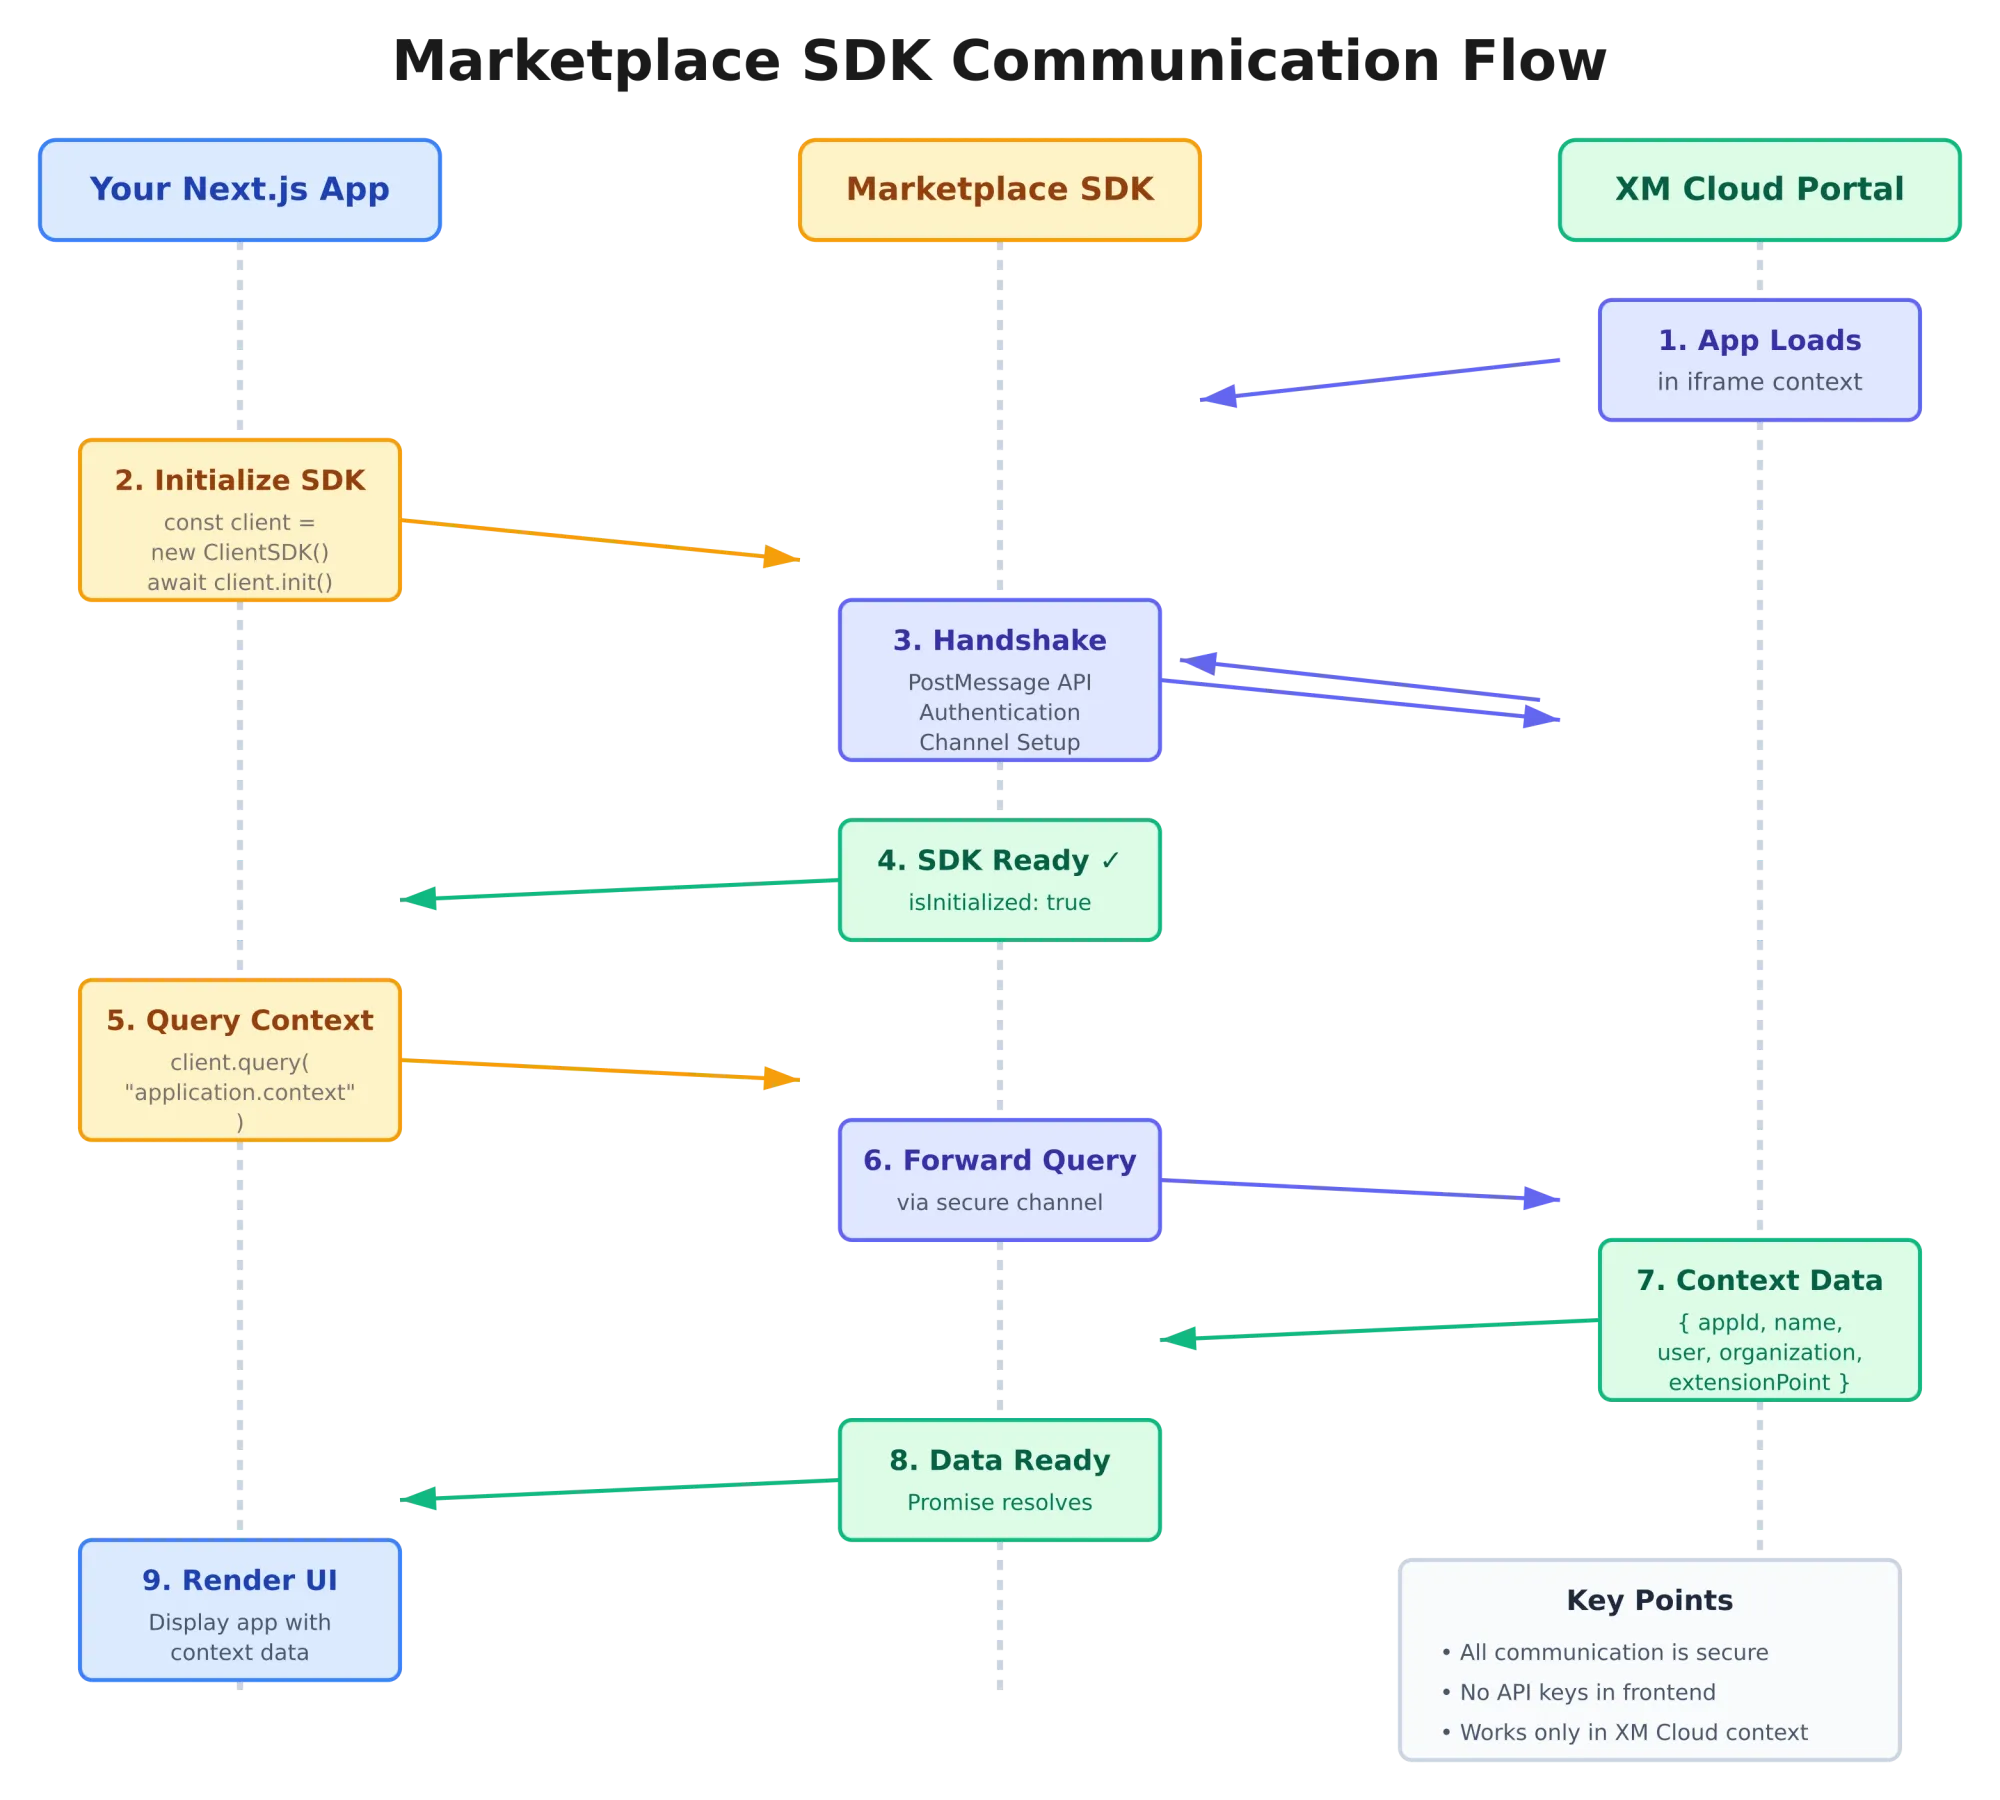
How It Actually Works
- Your app runs in an iframe inside XM Cloud Portal
- The Marketplace SDK establishes secure communication using the postMessage API
- Your app queries application context (user info, organization details, etc.)
- Your app can call XM Cloud APIs with automatic authentication
- Everything happens client-side—no server-side API keys needed
Key Concepts
Application Context
Every Marketplace app gets context data like app ID, current user, organization info, and which extension point is active.
Secure Communication
The SDK uses a handshake mechanism. You don't handle API keys or tokens in your frontend—it's all managed transparently.
Query-Based API
Instead of traditional REST calls, you query the SDK:
// Get application context
client.query("application.context")

// Get user profile
client.query("user.profile")
Setting Up Your Development Environment
Time to get our hands dirty. Let's set up a proper development environment.
Step 1: Access Developer Studio
Log into your Sitecore Cloud Portal. In the navigation menu, you should see Developer Studio.
If you don't see it, your organization might not have Marketplace access enabled yet. Contact your Sitecore admin.
Step 2: Create a New Next.js Project
Open your terminal and create a new Next.js app:
# Navigate to your projects folder
cd ~/projects

# Create a new Next.js app with TypeScript
npx create-next-app@latest sitecore-analytics-app

# Answer the prompts:
# ✔ Would you like to use TypeScript? → Yes
# ✔ Would you like to use ESLint? → Yes
# ✔ Would you like to use Tailwind CSS? → Yes
# ✔ Would you like to use `src/` directory? → Yes
# ✔ Would you like to use App Router? → Yes
# ✔ Would you like to customize import alias? → No

# Navigate into your new project
cd sitecore-analytics-app
Step 3: Install Marketplace SDK Packages
Install the required Sitecore packages:
# Core client package (required for all apps)
npm install @sitecore-marketplace-sdk/client

# XM Cloud API package (optional, for content operations)
npm install @sitecore-marketplace-sdk/xmc
What these packages do:
- @sitecore-marketplace-sdk/client: Handles secure communication, authentication, and SDK initialization
- @sitecore-marketplace-sdk/xmc: Provides access to XM Cloud APIs (content, publishing, search, etc.)
Creating Your First Next.js Marketplace App
Let's build a simple but practical app: a Content Analytics Dashboard that shows real-time statistics.
Project Structure
Here's how we'll organize our code:
sitecore-analytics-app/
├── src/
│   ├── app/
│   │   ├── standalone/
│   │   │   └── page.tsx        # Our main app page
│   │   ├── layout.tsx
│   │   └── page.tsx
│   ├── hooks/
│   │   └── useMarketplaceClient.ts  # SDK initialization hook
│   └── types/
│       └── index.ts
├── public/
│   └── logo.png                # App logo (512x512px)
└── package.json
Creating the SDK Initialization Hook
This is the heart of your Marketplace app. Create src/hooks/useMarketplaceClient.ts:
import { ClientSDK } from "@sitecore-marketplace-sdk/client";
import { useEffect, useState, useCallback, useRef } from "react";

export interface MarketplaceClientState {
  client: ClientSDK | null;
  error: Error | null;
  isLoading: boolean;
  isInitialized: boolean;
}

// Singleton to avoid re-initialization
let clientInstance: ClientSDK | undefined = undefined;

async function initializeClient(): Promise<ClientSDK> {
  if (clientInstance) return clientInstance;

  const client = new ClientSDK();
  await client.init();
  clientInstance = client;
  return client;
}

export function useMarketplaceClient(): MarketplaceClientState {
  const [state, setState] = useState<MarketplaceClientState>({
    client: clientInstance || null,
    error: null,
    isLoading: !clientInstance,
    isInitialized: !!clientInstance,
  });

  const isInitializing = useRef(false);

  const initialize = useCallback(async () => {
    if (isInitializing.current || clientInstance) return;

    isInitializing.current = true;
    setState(prev => ({ ...prev, isLoading: true }));

    try {
      const client = await initializeClient();
      setState({
        client,
        error: null,
        isLoading: false,
        isInitialized: true,
      });
      console.log("Marketplace SDK initialized");
    } catch (error) {
      const err = error instanceof Error ? error : new Error(String(error));
      console.error("SDK initialization failed:", err);
      setState({
        client: null,
        error: err,
        isLoading: false,
        isInitialized: false,
      });
    } finally {
      isInitializing.current = false;
    }
  }, []);

  useEffect(() => {
    if (!clientInstance && !isInitializing.current) {
      initialize();
    }
  }, [initialize]);

  return state;
}
Why this matters:
- Singleton pattern prevents multiple SDK initializations
- Automatic retry handles transient network issues
- Loading states let your UI respond appropriately
- Error handling shows users what went wrong
Building the Dashboard Component
Create src/app/standalone/page.tsx:
"use client";

import { useMarketplaceClient } from "@/hooks/useMarketplaceClient";
import { ApplicationContext } from "@sitecore-marketplace-sdk/client";
import { useEffect, useState } from "react";

export default function AnalyticsDashboard() {
  const { client, error, isInitialized, isLoading } = useMarketplaceClient();
  const [appContext, setAppContext] = useState<ApplicationContext | null>(null);

  useEffect(() => {
    if (!isInitialized || !client) return;

    async function fetchContext() {
      try {
        const response = await client.query("application.context");
        console.log("📦 Application context:", response.data);
        setAppContext(response.data);
      } catch (err) {
        console.error("Failed to fetch context:", err);
      }
    }

    fetchContext();
  }, [client, isInitialized]);

  // Loading state
  if (isLoading) {
    return (
      <div className="flex items-center justify-center min-h-screen bg-gray-50">
        <div className="text-center">
          <div className="animate-spin rounded-full h-12 w-12 border-b-2 border-blue-600 mx-auto"></div>
          <p className="mt-4 text-gray-600">Initializing...</p>
        </div>
      </div>
    );
  }

  // Error state
  if (error) {
    return (
      <div className="flex items-center justify-center min-h-screen bg-gray-50">
        <div className="bg-red-50 border border-red-200 rounded-lg p-6 max-w-md">
          <h2 className="text-red-800 font-semibold text-lg mb-2">
            Initialization Error
          </h2>
          <p className="text-red-600 text-sm mb-4">{error.message}</p>
          <p className="text-gray-600 text-xs">
            Make sure you're running this inside the XM Cloud Portal.
          </p>
        </div>
      </div>
    );
  }

  // Main content
  return (
    <div className="min-h-screen bg-gray-50 p-8">
      <div className="max-w-6xl mx-auto">
        <div className="mb-8">
          <h1 className="text-3xl font-bold text-gray-900 mb-2">
            Content Analytics Dashboard
          </h1>
          <p className="text-gray-600">
            Welcome to {appContext?.name || "your analytics app"}
          </p>
          {appContext?.organization && (
            <p className="text-sm text-gray-500 mt-1">
              Organization: {appContext.organization.name}
            </p>
          )}
        </div>

        <div className="bg-white rounded-lg shadow p-6">
          <h2 className="text-xl font-semibold mb-4">Quick Stats</h2>
          <div className="grid grid-cols-1 md:grid-cols-3 gap-4">
            <StatCard title="Total Items" value="1,247" color="blue" />
            <StatCard title="Published Today" value="23" color="green" />
            <StatCard title="Draft Items" value="156" color="yellow" />
          </div>
        </div>
      </div>
    </div>
  );
}

// Stat card component
interface StatCardProps {
  title: string;
  value: string;
  color: "blue" | "green" | "yellow";
}

function StatCard({ title, value, color }: StatCardProps) {
  const colors = {
    blue: "bg-blue-50 text-blue-700",
    green: "bg-green-50 text-green-700",
    yellow: "bg-yellow-50 text-yellow-700",
  };

  return (
    <div className={`${colors[color]} rounded-lg p-4`}>
      <p className="text-sm font-medium opacity-80">{title}</p>
      <p className="text-3xl font-bold mt-2">{value}</p>
    </div>
  );
}
Understanding the Marketplace SDK
Let's break down what's happening in our code.
SDK Initialization Flow
- App loads in XM Cloud iframe
- SDK establishes secure handshake with the portal
- Authentication happens automatically
- Client is ready for queries
The Application Context
When you query application.context, you get:
{
  id: "app-123",
  name: "Content Analytics Dashboard",
  organization: {
    id: "org-456",
    name: "Your Company"
  },
  user: {
    id: "user-789",
    email: "you@company.com"
  },
  extensionPoint: "standalone"
}
This context is crucial—it tells your app who's using it, where it's running, and what permissions it has.
Registering Your App in XM Cloud
Now let's get your app visible in XM Cloud Portal.
Step 1: Run Your App Locally
npm run dev
Your app should be running at http://localhost:3000/standalone.
Important: Don't visit localhost directly—it won't work. The SDK requires the XM Cloud context.
Step 2: Create App in Developer Studio
- Log into Sitecore Cloud Portal
- Navigate to Developer Studio
- Click "Create"
- Select "Custom App"
Step 3: Configure Your App
Fill in these details:
Basic Information:
- App Name: Content Analytics Dashboard
- Description: Real-time content statistics and insights
- App Logo URL: https://delivery-sitecore.sitecorecontenthub.cloud/api/public/content/84e2fe0c5c864276982940181a1f0fe3?v=39975d16 (use a proper logo later)
Extension Points:
- ✅ Standalone application
- ☐ Full-screen experience
- ☐ Site dashboard widgets
- ☐ Custom fields
Deployment:
- Deployment URL:
http://localhost:3000/standalone
API Access:
- For now, don't enable any APIs (we'll add this in Part 2)
Step 4: Activate and Install
- Click "Save"
- Click "Activate"
- Go to "My Apps" in the portal
- Click "Install" on your app
Testing Your App
Once installed, you should see "Content Analytics Dashboard" in your Cloud Portal navigation.
Troubleshooting Common Issues
Issue: SDK initialization fails
- Make sure you're accessing through Cloud Portal, not localhost directly
- Check browser console for detailed errors
Issue: App doesn't appear in navigation
- Verify app is "Active" in Developer Studio
- Make sure you clicked "Install" in My Apps
Issue: Blank screen
- Check that deployment URL matches your Next.js route
- Ensure dev server is running (
npm run dev)
What's Next?
Congratulations! You've just built and deployed your first Sitecore Marketplace app.
In Part 2
- Building all four extension types (standalone, full-screen, widgets, custom fields)
- Integrating with XM Cloud APIs to fetch real content data
- Creating production-ready components with proper error handling
- Adding real-time data updates
In Part 3, we'll cover:
- Deploying to production (Vercel, Netlify, Azure)
- Performance optimization and best practices
- Security considerations and common pitfalls
- Building apps for the public Marketplace
Useful Resources
Found this helpful? Share it with your Sitecore developer community! Have questions? Drop them in the comments below.